Sunday, February 14, 2010

Chinese New Year Chronicles: Part II


If there's Part I, there ought to be at least a Part II right?

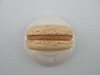
So, here it is, pineapple tarts, nastar style. I was really excited to try out this new style of pineapple tarts. And I must say, I'm pretty happy with the way things turned out, especially since it is my maiden attempt.

For some reason, it seems like many people are attempting this style of pineapple tarts this new year which really made me geared up to try these little rolls.

Some time last year, I came across a biscuit pump and I just had to buy it. I told myself I would I want to get the biscuit pump, so when the time comes, I'd have no excuse not to try. Right? Wrong. I nearly gave up the chance of opening my brand new biscuit pump especially since after a full week of pineapple tart making

What made me press on (pun intended) was the remaining balls of pineapple filling and that I was tasked to bake at least one bottle of tarts for ourselves. 


 I was reluctant to search for a new recipe and so I decided to modify my previous pastry recipe to hopefully, make it work for the nastar type. Since I knew that the pastry had to be soft enough to be piped out, yet firm enough to retain its shape and pattern during the baking process, I simply added more yolk to the pastry dough.

Although the tarts turned out acceptable, it wasn't as good as I was expecting it to be. The pastry had a little melt down and the patterns were not as visible =( However, my mum's friend loved it and said it was simply "melt-in-the-mouth".

With the amout of hard work involved, it is no wonder why these type of pienapple tarts are a tad pricey. The laborious action of having to pipe the dough, roll it up and cutting off the excess is jus simply time-consuming. My mum took a liking to how pretty each one looked when lined up on the baking tray and asked why didn't I sell these instead. Well, I guess it is pretty obvious, because of the amount of time spend laboring over each and every single tart, this is an absolute no-no for large scale productions, in a home kitchen.

Without further ado, here goes the recipe! With step-by-step pictures which I hope will inspire some to try this out. Next CNY perhaps? =p

Pineapple Tarts - Nastar Style
makes ~150 or more

Ingredients:

A:
360g Unsalted Butter, cold and cubed

B:
480g Plain Flour, sifted
100g Icing Sugar, sifted
2 Tbsp Custard Powder
4 Tbsp Milk Powder
1/2 tsp Salt

*mix well*

C:
3 Egg yolks
1-1/2 tsp Pure Vanilla Extract

*mix well*

Method:
1. Rub A into B until the mixture resembles bread crumbs.
2. Add in C until a soft dough forms.
3. Using a biscuit pump, attached with the desired pattern, fill the pump with pastry dough. do not attempt to fill it to the brim as you will encounter difficulty pumping the dough out. Fill it just 1/2 full.
4. Pipe out a strip of dough approximately 10-12cm long. It's better to have it longer than shorter, as the excess could always be cut away.


5. Roll 1 level teaspoon of pineapple filling into a small sausage. approximately the width of the piped dough. And place the filling on one end of the piped dough.


6. Starting from the end with the filling, roll up the dough swiss roll style.


7. Cut away the excess dough with a knife. The excess dough can be gathered and used again and again until all the dough has been used up.


8. Place it on a baking tray. Pre-heat the oven to 190C and bake for 12 min.


9. Remove the baked tarts from the oven and allow it to cool on the baking tray. Store it only when they have cooled completely.


Enjoy!!


Saturday, February 13, 2010

恭喜恭喜!!

Here's wishing everyone a very Blessed Lunar New Year! Happy 2010 everyone!


恭祝大家新年蒙恩!恭喜恭喜!希望大家在这虎年里顺顺利利,心想事成!


Chinese New Year Chronicles: Part I


FINALLY! After some 70 pineapples, 13 blocks of unsalted butter, 4 packets of plain flour, some custard powder and milk powder, D and I finally managed to finish the daunting task of baking close to 1000 pineapple tarts, tangerine style.

I intended to and was supposed to open the new year goodies for sale officially. However, the 3 orders that came along the way proved impossible to take on anymore additional orders. You see, I had previously baked a batch for D to bring to office as a sample, for his colleagues to taste test. I don't know if it was good or bad, but news travelled quite far and some colleagues whom never tasted it actually daringly place an order. So, there was a total of 13 tubs of pineapple tarts, 48 tarts in each tub.

Additionally, the sight of us making pineapple tarts day in day out, night in night out probably tempted my mum to actually order 10 small tubs (24 tarts each) and 2 tubs. Yes, my mum actually did order it from me. She actually paid me.


Baking non-stop for a week after work was no easy task. Especially since, yours truly, needs sleep the most. I ended up sleeping at 1plus, 2 in the morning for almost the whole of January and I'm truly hoping for some good rest during this CNY break!

I tried using ready made paste for the taste-test batch, but the ready made filling only proved too dry and a serious lack of real pineapple taste. Oh! and did I mentione, it was a tad too sweet. Sweet + no pineapple tang = no-go.

I nearly fainted at the thought of having to slave over the hot stove cooking pineapple filling enough for 1000 pineapple tarts! That was just insane. BUT,thank God for microwave invention. I vaguely recalled coming across SeaDragon's blog which showed a way to microwave pineapple filling. And boy! I immediately jumped at doing so! *click here*

I only used his guide for the first time I was doing it, but after getting used to the microwave, I changed the timing and learnt how to judge the doneness and knowing how much longer to cook it for.

As a rough guide, to be on the safe side, microwave your grate/blended pineapples on HIGH for 10 min first, take it out and give it a stir. Pop it back in for another 10 min and thereafter only go at 5min intervals. The doneness of the pineapple filling depends on how moist/dry you like your filling to be. Of course, the moister it is, the shorter the shelf life. The drier is it, well you know, the less tasty it is. But whatever it is, homemade filling is definitely better especially since you could control the amount of sugar!

For me, I added ~45-55g of sugar per pineapple depending on sweet or sour the pineapple began with. Oh! and be sure to drain the pineapple of the juice, this helps ALOT in speeding up the cooking process. OF course, you could leave the juice ALL in, but it'd just take a much longer time to cook, a much long time for the juice to evaporate and dry up the paste.

I have modified the recipe I used for last year's pineapple tarts and found that the addition of milk powder gave the tarts an exceptional fragrance and the addition of custard powder gave the pastry a nice yellow colour. I'm not sure if it contributed to the pastry's texture, but they sure were melt-in-the-mouth. YUMS!

So, without further a-do, here's my version of pineapple tarts - tangerine style for this year! =) Enjoy!


Pineapple Tarts - Tangerine Style
Makes approx. 60 tarts

Ingredients:

A:
180g Unsalted butter, cold and cubed

B:
240g Plain Flour, sifted
100g Icing Sugar, sifted
1 Tbsp Custard Powder
2 Tbsp Milk Powder
1/4 tsp Salt

*Mix well*

C:
1 Egg yolk
1/4 tsp Pure Vanilla Extract

*mix well*

Egg Glaze:
1 egg yolk + some water to dilute

Method:
1. Rub A into B until the mixture resembles breadcrumbs.
2. Add in C and mix until a soft dough forms.
3. Measure out leveled 1/2 tablespoonefuls of dough and roll them into balls and set aside.
4. Measure out 1 leveled teaspoon of pineapple filling, rolled into balls and set aside.
5. Pre-heat the oven to 190C.
6. Flatten the prepared dough and wrap the pineapple filling in. Place the completed tart into small paper cases (or directly onto baking tray).
7. Bake in pre-heated oven for 6 min. Take out tray and brush on egg glaze and return to the oven for a further 6 min.
8. Allow the tarts to cool completely before storing.


Friday, February 12, 2010

forever twenty-one

I just had, not one, but two 21st birthday orders within just a week apart! To add on to the fun, this is my 100th post YAY! And of course, I hope my blog would remain as happening  as possible and just like the fashion label, forever twenty-one.

Many say that time seems to move twice the speed once you hit the age of twenty-one and I somehow got to agree with that. However, upon deeper reflection, I guess the magical fast forwarding of time doesn't happen when you hit the magic number 21, but rather, as you progress, responsibilities pile up and with that comes investment of time to maintain those responsibilities.

Just take for example, when we were young, all we had to fret was, studies, test and grades and probably how to prevent my classmate from stealing my notes or worse still, stealing my eraser or crossing over to my "territory" marked by an invisible line on our tables. Other than that, we lucky brats of this age practically had to worry nothing about food and clothing. Now that I've those who have crossed the 21 boundary, suddenly find themselves struggling to find an ideal job and managing their finanaces and increasing responsibilities. In a split second, the list of things to do gets longer and longer and you start finding that time is zooming by faster and faster.

And... I am reminded of how long ago was my 21st birthday whenever I come across someone else who has just turned 21.

Many thanks to my secondary school classmate, Eunice for introducing me to her friend, QY to order her 21st birthday cake from me =) It wasn't too difficult for me to conceive the idea of how the cake should look like because QY already had something in mind and even had a picture of how she wanted it to look. Of course decisions like sizes and colours and other minor details had to be made and THIS was what the final product was.

The cake was a simple vanilla butter cake sandwiched with yummy yummy nutella buttercream for the bottom two tiers and nice, tangy lemon buttercream for the top most layer! It was a pretty huge cake which was REALLY REALLY heavy. Cake sizes measured, 10" - 8" - 6". Each layer was a little more than 3" tall so you could just imagine how heavy the cake was with the fondant =XX

To complete the sweet pink, floral 'feel', I added a "tiara" and a fondant key since she was celebrating her 21st. Although I don't quite know the true significance of a key, but I do believe it's somehow symbolic of your key to the gates of adulthood.

And so, if you're wondering who's the next lucky one who's just turned 21, it's none other than Eunice's sister, Evon.

                 
Eunice saw my "chirstmas" cookies post and wanted those cute 3D cookies and in my opinion, I think those made perfect door gifts and not to mention, they are cute, even when plain!


These cookies are pretty huge so don't be fooled by the photo. Eunice actually asked how big a plate was needed to display the cookies so that the guests could jus take and eat them (like buffet style). I told her she'd need something that's at least 30" x 30" for 60 cookies.


Several days later, she increased the order to 70 cookies! 35 of pooh and 35 of mickey! Although no decoration needed to be done, assembling and packing the cookies were more time consuming and laborious than baking them! Not to mention, I had to bake extra because of my mighty strength I broke a few legs, necks and ears =X So I had to re-do almost 5-7 of mickey and pooh =(((

I had no idea how should I get the body stuck to the legs, so i used royal icing to "glue" them together. I guess the humidity in our Singapore air kinda softened the cookies a little and on hindsight, I think I should have placed a packet of oxygen absorber thingy in each packet. oh wells, lesson learnt! The cookies were a breeze to make, especially when I kinda memorised the ingredients after the 300 wedding cookies. BUT bending and rolling them out were a PAIN, literally and mentally. Especially if the ears broke off while transporting it from the table to the baking tray.

But nonetheless, I managed to get the cookies all packed, sealed. All tags cut and attached. DONE, before the scheduled pick-up time. PHEW! I think this is one of my rare orders that I need not rush and for once, I could breathe a sigh of relief and snap away while waiting for the cookies to be picked up! =DD

Like flowers which blossom and wilt and die, so do humans blossom, age and pass on. I guess it's not a matter of how long we maintain our youth or even "feel youthful" in our golden years. But rather, what have we accomplished in the days of our youth that is worth remembering. The period might be short-lived, but as long as it was spent meaningfully in an worthy, impactful manner, we could be, potentially, forever twenty-one.

Friday, February 5, 2010

With loveee...

Marriage has always been an issue of debate, even in the past. I believe that unhappiness and divorces did happen in the past, though probably not as prevalent and short-lived as the present.

My friend was just lamenting the purpose of the marriage certificate and questioned if it's existence is ultimately only a tool for self-protection. Without the cert, there's no argument for alimoney fees, without the cert, there wouldn't be any say in co-ownership of a flat/house. Without the cert, there probably is no reason to stay legally binded. Having said that, the binding power of the marriage cert is fast losing it's grip in today's time and society. Marriage as an institution is collapsing fast and the only one's who'd suffer are our future generations.

While getting married is truly something worth rejoicing and celebrating, it is really only but the beginning of a long, ardous journey together. I am not married, yet. But after witnessing the fall of many marriages of people around me really saddens me and makes me question the integrity of this institution.

However, I do believe that happy and ever-lasting marriages do exist. But those don't come easily and of course, effort and hardwork has to be put in to keep the love flame burning.

So, here's me wishing Philia and Xavier a happy, ever-lasting marriage. May the both of you work hard at keeping your love for each other burning!

I was tasked by Philia to bake her wedding favours and I was really excited as it's really, the first time I've done anyone's wedding favour =p It was easy to get it done because she knew what she wanted exactly and even showed me a picture. I was worried of not being able to get it done (especially when work zaps half your life) but she made things simple yet sweet. 3 small hearts in one packet, coloured white, pink and red respectively. With vanilla, chocolate and lemon cookies. Thank goodness she asked for small cookies if not, I wouldn't dare imagine how late I'd go to bed, slogging to finish baking these cookies.

Even so, baking them was no mean feat. Especially when 100 packs were order, which mounted to 300 cookies!! A day to bake, a day to ice, a day to pack. It was not easy, but D was sweet to help me out every single night. Seems like he's unofficially my business partner now =O Packing seems like something easy, but hey, it ain't easy when you have 3 different cookies to pack, seal and tie up complete with a tag. Not to mention, printing and cutting the tag needed time too!
It's a pity that I don't have a picture of the completed look of the wedding favour, but I hope you'd get an idea from the picture above.

Anyhow, here's wishing Philia and Xavier a blissful, happy marrige! Congratulations!!


Tuesday, February 2, 2010

Durian, Episode 2


Gee.. I hadn't realise it'd been so long since I posted anything until Jane actually asked if my bakings were coming along fine. =X

You people must be thinking that I just totally busted my "new year's resolution" of wanting to post more recipes etc etc..Well, aren't resolutions meant to be broken? So, that's why you make them? no? =p

Work's keeping me busy busy, not because I have loads to do but because working hours just sucks up 3/4 of your waking hours. Coupled with recipes to try, CNY and orders, I'm starting to feel that 24 hours is seriously not enough. Not that I wish a day had 48 hours for I would have collapsed before the day even ends. This crazy schedule landed me sleeping at past 1, sometimes even past 2 in the morning and poor D had to suffer with me =X Not to mentioned, I baked through the night till 5.30 AM one Friday to deliver my dad's company cake the next day. The story, of which, I'll leave it to another post..

Now, concentrate.

I have a love-hate relationship with durian. They're so pungent they make thinking there's a leaky gas tap around the house, yet they can be oh-so alluring when that creamy yellowish flesh melts in your mouth and slides down your throat and what you have left is the smell in your mouth that lingers for hours, sometimes making you beckon for more.. I'm not one who truly appreciates eating the fruit itself, but I must admit that my knees go weak when I have a good durian dessert.

Most durian desserts are mixed with cream or added with some other ingredients which to durian purist, is crap. But for people like me? It's perfect. The cream tones down the otherwise sharp, pungent taste yet preserving the unique taste and smell of a durian. As such, how could I say no to a workshop that covers a variety of durian related dessert? Most of all, what lured me to signing up what a durian chocolate truffle cake. I was instantly reminded of Spike-D from Big O.


The workshop was pretty relaxing and the pace was ok, and the recipes taught were elegant yet simple. I haven't found the time to re-create any of the recipes at home as im still in the midst of racing against time.

Verdict? A pretty comprehensive workshop as I learnt some other techniques and learnt how to handle fruits in bakes. As for the taste, you either love it, or hate it.


Related Posts with Thumbnails